Microblading Top Technical Skills

Microblading top technical skills: STRETCH, ANGLE AND SLOW-FLOW
Microblading has taken the beauty industry by storm. Artists love the idea of tattooing the way they naturally draw and not having to worry about cumbersome wires, power supplies and vibrations. The technique is very artistic and intuitive; allowing the artist’s design to “flow” from her mind to the canvas of the skin. It’s not surprising that artists worldwide have quickly embraced microblading and clients are asking for it by name.
There are many challenges in performing microblading properly to obtain the best results. Like any technical skill, proper form is paramount.
In this article, I will share my top 6 technical skills that artists must work at through endless repetition in order to master microblading.
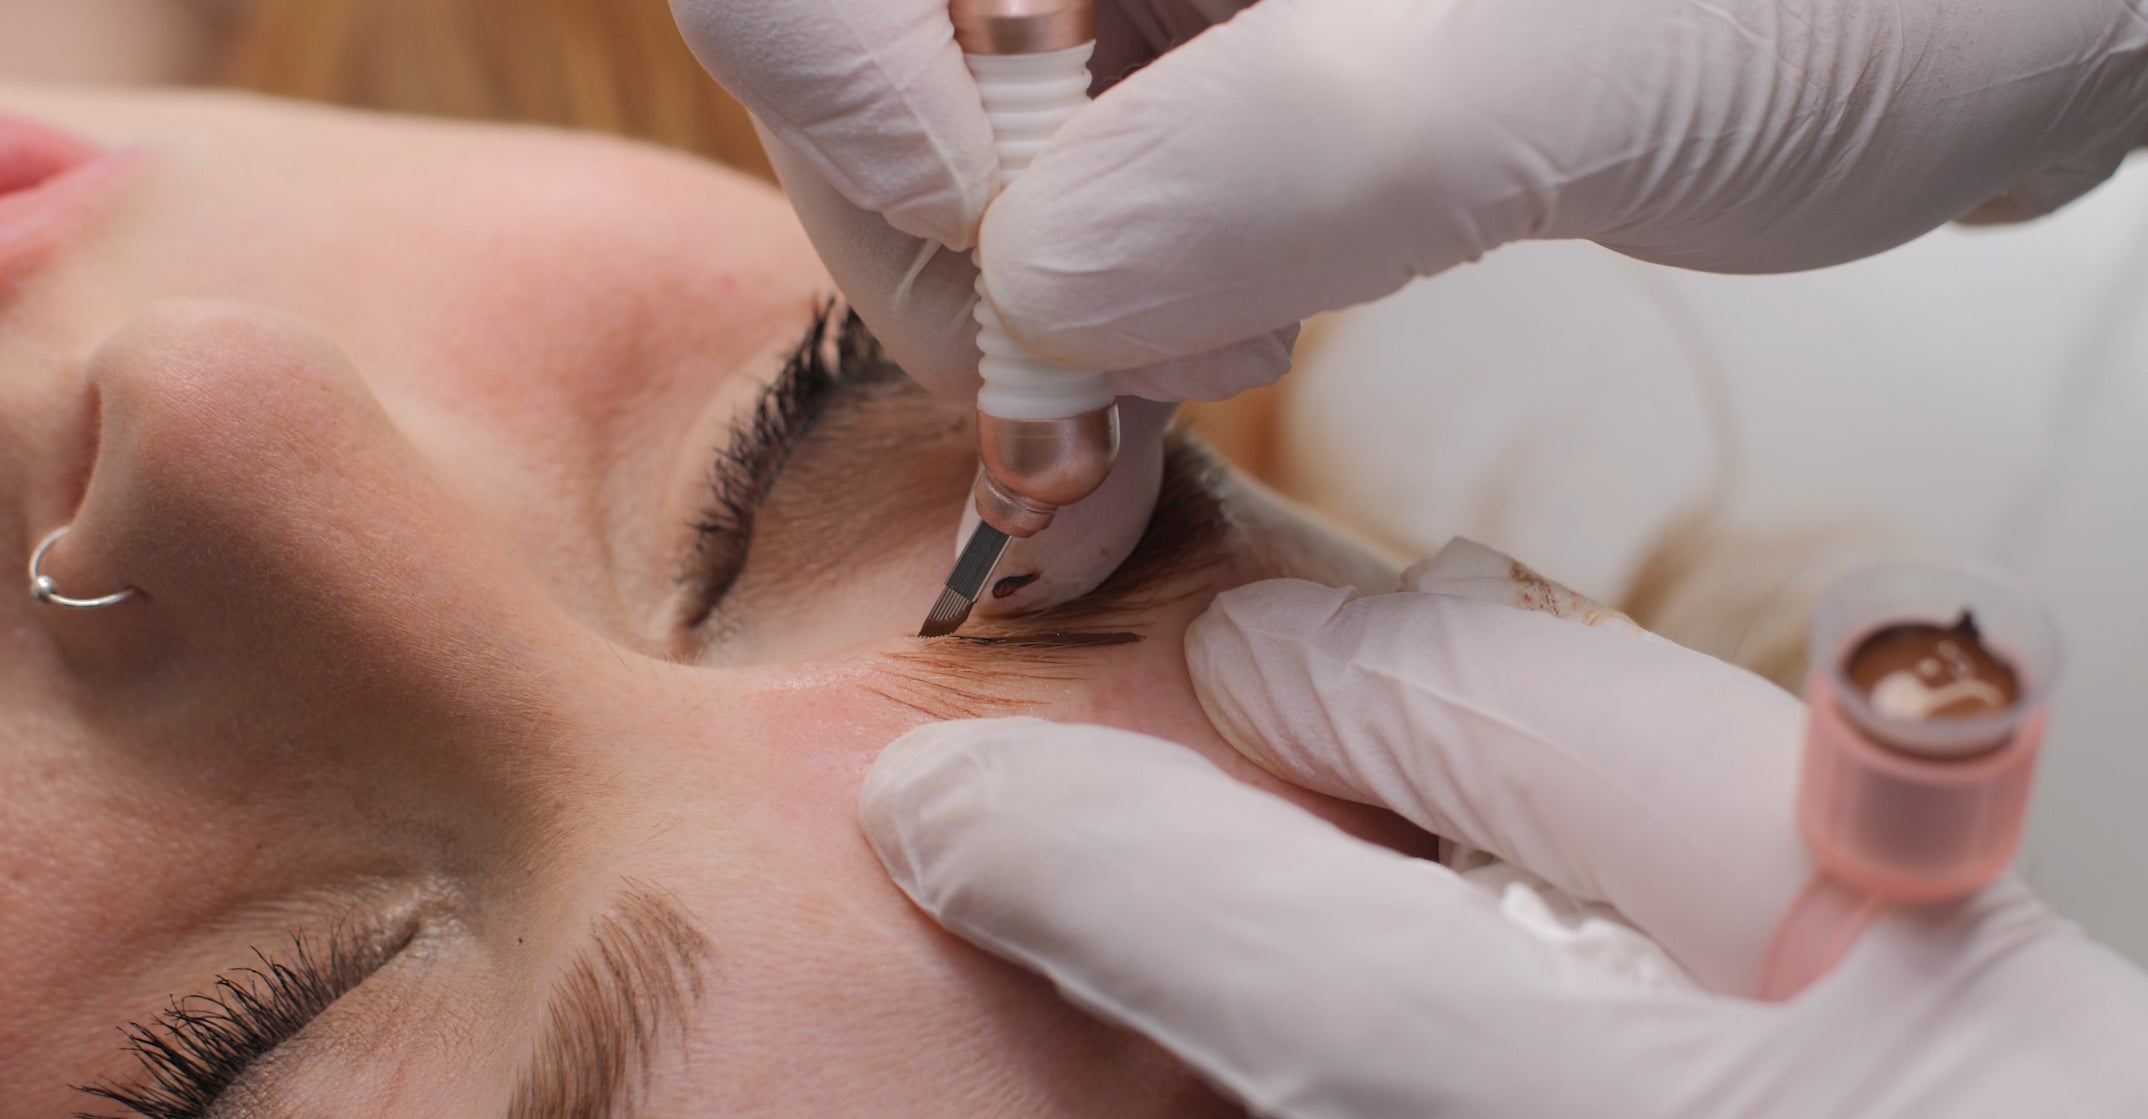
1. Stretch

3-point stretch with 3 fingers stretching the skin in opposing directions.
Hands-down the most important factor in getting great strokes is making great stretches. The key to getting a proper stretch is to flatten the skin in 3 opposing directions. This is called a 3-point stretch. The stretching hand (the hand without tool) should be placed strategically along the client’s forehead to pin the skin down and spread it apart in small, taut stretches. This forms 2 of the 3 points. Now, at the same time, the pinky of the working hand must stretch in an opposing direction to complete the 3-point stretch. Just when you think you can’t get the skin any flatter, you’re almost there. Remember, when the skin is flat, the stroke will be clean since the surface is void of wrinkles and bounce.
2. Depth

See the sweet spot here with pinpoint bleeding.
The most common question I get asked by artists is about depth. Depth is critical because if you go too shallow you will only land in the epidermis, and the color won’t stay. If you go too deep, you can cause scarring and the color will heal too ashy. So how do you figure out the perfect depth? The truth is, it’s very tricky as every client has a different skin thickness and often the skin will be much thinner at the tail of the brows than the bulb of the brow. In order for the color to stay, you’ll need to microblade to the upper dermis, but no further. A tell-tale sign that you’ve hit the upper dermis or the “sweet spot”, is when you see a slight channel in the skin, oftentimes marked by pinpoint bleeding.

3. Read The Skin
In my experience, the skin comes in 4 thickness varieties: super-thin, thin, regular and thick. You need to understand the tolerance level of the skin to understand its breaking point. This knowledge will be gained through experience and will help you to understand the proper depth in which to microblade. Imagine two scenarios: slicing tissue paper and slicing paper towel. When you become familiar with working with different skin types, you start to understand if you need to treat your canvas like a tissue paper or a paper towel. Knowing the skin and microblading to the tolerance level of that skin type will help you microblade to the proper level without overworking the skin. Less trauma = better results.
Read more about client skin thickness, how you determine your client’s and how it affects your depth HERE.
4. Angle

The biggest mistake I see people make is in this category. Pay close attention to the angle the blade enters the skin. The needle MUST enter in an upright position and not at an angle. If you look at the side profile of a high-quality microblading hair stroke, you will see that the needle penetrates the skin at a 90-degree angle with full contact of all needles touching the skin. Imagine trying to cut a piece of paper with your scissors on an angle-it’s not very effective. Microblading is similar. If you are not penetrating the skin with a perpendicular angle, the quality of the stroke will be compromised and hair strokes will be fuzzy.
5. Consistency
In microblading, the tortoise always wins. It’s very important to use a slow, steady and consistent pace. Not only should you concentrate on making each stroke slowly, but you should also be acutely aware of the pace of the entire procedure. Don’t get caught up in a speed trap and accelerate your work as you progress as your results will suffer. With each case, you will encounter challenges like bleeding, lax skin, or thick patches of hair and the best way to deal with these challenges is to work at a slow consistent pace. When you stroke slowly, you will work with more precision and overcome these types of obstacles. Focus on making each stroke count. Remember, slow and steady wins the race.
6. Follow-Through
It’s important to finish each stroke evenly with the same speed and pressure. You never want to use two (or more) strokes to represent a single strand. Some strokes will be longer than others so make sure you finish each one and follow through. Take your time here and work slowly to be consistent and precise.
Gaining proficiency at microblading requires a tremendous commitment to consistency and detail and by repetitive practice, you will build the required muscle memory.
So remember STRETCH, ANGLE, & SLOW-FLOW.
A word about training: through proper training and dedication to continuing education, you can obtain the theory, background and skills that are required for beautiful results. Prior to committing to any training courses, I strongly recommend artists interview their training instructors by phone or in-person as it will be one of the most important investments one will ever make on their path to success. Professional instructors are never bothered by this process as the good ones are eager to share and mentor students. How many times have you heard of people retaking basic fundamental courses over and over again after being disappointed with inadequate training? If you do your homework upfront and select a good trainer you should only have to do it once.
Along with proper training, I cannot over-stress the importance of a strong knowledge of cross-contamination and the risks associated with blood-borne pathogens. This education is mandatory for all artists performing any permanent makeup procedures regardless of technique and is critical to protect both the public and the artist. In addition, it is critical to maintaining a safe and professional working environment and only use sterile and disposable tools. Building and maintaining a solid reputation depends on your commitment to all safety aspects of this professional trade.
Remember, there are no shortcuts, only hard work. Practice the 6 key steps with a commitment to excellence and I promise you will exceed not only your own expectations but your client’s as well.
Looking to continue your education and learn new skills & techniques? The Collective offers a variety of courses perfect for all levels of PMU artists looking to continue their education. Get the experience of in-class training with benefits from your home - with lifetime access, you can stop, start and re-play as often as you need. With printable resources, experienced instructors and continued artist support, learning has never been easier. Discover what The Collective has for you.


Leave a comment
This site is protected by hCaptcha and the hCaptcha Privacy Policy and Terms of Service apply.