Case Study: Innovative Eyeliner

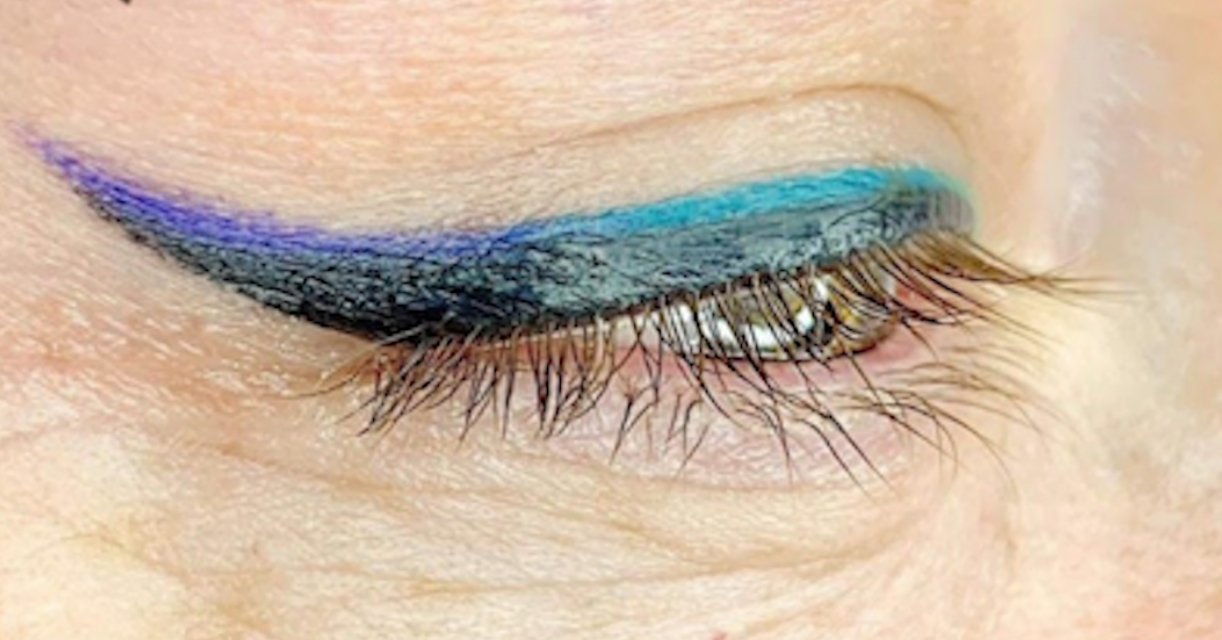
Healed
If you can dream it, she can do it.
Eyeliner has the power to extend and lift the eye while enhancing the natural eye color. From winged to cat eye to a classic natural look or shadow, the possibilities are endless.
In today’s case study, Anita Abramo, PMU Specialist & Tina Davies I❤️INK Pro Artist located in Canada, shows her amazing skill and true artistic ability in this beautiful colorful eyeliner making her client look and feel AMAZING!
PLUS, are you struggling with achieving crisp, rich and dark black eyeliner? Anita shares her expert tips and tricks to getting a crisp black eyeliner with no blue hues. From the artistic process of color selection to the tools used, learn how you too can create flawless and totally bad-a$$ eyeliner.
Client's Goal
My client walked into my studio requesting the classic extra black and crisp winged eyeliner. It’s the request most clients come in with when looking to get an eyeliner tattoo. Initially, she wanted a plain old black eyeliner but after our consultation, she walked away with this gorgeous mermaid inspired look!
Client's Skin Type
Her skin is a fair, Fitzpatrick 2 skin tone which means her skin will further cool pigment colors once healed, so adding extra warmth is important to prevent her skin from ashing out the pigments. My client’s eyelids had quite a few vascular veins, which means she is at a higher risk of migration. Due to this, watching my pressure and angle will be key. If your client has a vascular eyelid, your pressure and needle angle is EXTREMELY important to prevent the pigment from migrating in those areas.
Design Approach
With gorgeous green eyes, a nice winged eyeliner will make the eyes pop but I wanted to give my client something that would be truly unique.
You may be wondering, how did you get to this colored eyeliner when she was only asking for a black eyeliner? The answer is, personally, I always love to suggest adding a pop of color to my clients. I love to give my clients a custom made eyeliner that makes them feel FIERCE!
I showed her some healed results of other colored eyeliners that I had completed, and she absolutely loved it.
It is important to gather healed results from your clients. As we all know, the results on the day of are always much bolder and intense versus the final healed results. I show my clients the before, after and healed photos and make sure to explain how once healed, it will be softer than those immediate results.
Drawing out what I envisioned for her, we worked together on choosing the colors. To make her feel even more comfortable, I gave her the freedom to choose the colors she would like to use. She selected a vibrant green pigment and a beautiful purple pigment. With her gorgeous green eyes, I knew these colors would make them stand out even more!

Pigment Colors Used: Perma Blend Blackish Brown, Perma Blend Double Black, World Famous Caribbean Sea, World Famous Galapagos Green, World Famous Leaning Tower of Purple
Shop Perma Blend Eyeliner Pigments
Now that we have chosen the colors, I played around testing the drawdowns of each pigment using white paper and baby wipes. By performing drawdowns of my pigments, I will have a better understanding of how the color will perform and heal.

Next, I began mixing the pigments to see all the color combinations possible to create. Together we decided on going gradually from green on the inner corner to vibrant blue in the middle and bright purple at the tail.
I always assure them, if they are unhappy, we can cover it up easily on touch up with black, just like that! But, they will absolutely LOVE IT!
Technique(s) required
My client had very thin, vascular lids, which means higher risk of migration, so I would need to watch my pressure, technique, needle configuration as well as the black pigment choice. Starting with the needle configuration, I’d need more than one to complete my eyeliner, 1RL .25mm for the precision areas (such as at the wing), and 3RL .25mm for the lash line. I personally like to use a 3RL or 3RS to do the lash line.
Understanding your needles is VERY important. I rarely use just 1 for my procedures. Depending on the area, the look you are trying to achieve, client skin type etc, enhanced needle knowledge is what will take you from being just a good artist to a GREAT artist.
When working with vascular lids, keeping a 90 degree angle and working with less pressure in the areas with more vascular veins is very important. You need to be extra careful in these areas as it is more likely for pigment to migrate.
With her fair, Fitzpatrick 2 skin, I will need to ensure that the black eyeliner is warm enough to prevent an ashy healed result. Cool skin will ash out pigments, so making sure there is warmth will keep it looking dark and rich.
Previously, I struggled to get a perfect black healed liner, no matter how much I modified it, there was always a slight blue hue and never quite rich enough for me. So, I asked another veteran in the PMU community, what was her secret? She said, LAYERING. Layer your color, starting with a warmer base then layer your cooler, black color on top. Starting with warmer bases, such as Perma Blend Darkest Brown or Blackish Brown before going in with a Black pigment will help keep that eyeliner looking rich and dark.
With this knowledge, I chose Perma Blend Blackish Brown to layer first for the warmth, then Perma Blend Double Black to layer on top.
PRO TIP: Layering the color is KEY! This also helps when working with carbon based pigments. starting with an iron-oxide base then adding carbon means you are adding less carbon as you are layering on top of the iron-oxide base.

Shop Perma Blend Blackish Brown Pigment

Shop Perma Blend Double Black Eyeliner Pigment
*Perma Blend Double Black has the highest carbon load, it is for experienced, professional artists and for those experienced with carbon black. Learn more about carbon vs iron-oxide eyeliner pigments and how to use each here.
Prep & Pre-Draw
I started by numbing my client with a topical anesthetic. I then pre-drew the winged outline using a black pencil. Be sure to check your measurements on both sides for symmetry and confirm with your client on shape. Once the shape is confirmed, it is time to start the procedure!
Plan of Action
Every eyeliner procedure I do, I start with the lash line. Using a 3RL .25mm needle I start by filling in the lash line, once the lash line is in, I etch the wings on both sides using the 1RL .25mm needle and provide more numbing with a secondary numbing agent.
Pro Tip: Using a bigger needle configuration will pack in the color quicker. I use a bigger configuration when doing the lash line.
Once my outline is in, I use Perma Blend Blackish Brown, which is an iron-oxide/carbon based pigment so it is less likely to migrate, and adds extra warmth. When working with a thicker eyeliner it is important to do this step to get perfect healed results. I complete 2 passes with Blackish Brown, once I have completed this, I do 2 passes with Perma Blend Double Black pigment. Using a layering variation of 50% Blackish Brown and 50% Double Black helps keep the healed results stay rich with no blue tinge. plus, avoiding putting too much carbon in the skin decreases the chances of migration. At the base I used a whipping technique to pack in pigment.
After the main black eye line is complete, it is time to start layering in the color. I started with purple working from the outside in. about ¼ of the way, I then switched to the blue pigment, starting from where I left off with the purple and working my way in. Next, layered in the lighter green pigment from midway to the corner. Layering the colors back and forth over each other using a whip shading technique to create a beautiful transition.
Using the Tina Davies 1RL Precision Needle for the wing allows me to stay super precise, make thin lines and complete an airy shading. In order to create the beautiful airiness, I use a flickering down and up movement with my hand, this creates a gradual shading and the soft, airy look.
Pro Tip: Apply gel ice packs to help calm down the swelling. Clients with more vascular lids will have more swelling due to them having more blood in the lids naturally.

Immediately After
Healed
Tools Used:
One of the most important things is to always have a few different needle configurations available on your station. I frequently use more than 1 cartridge during a procedure depending on where I am working on the lid and what finish I am looking to achieve. Think about how makeup artists use their brushes or even your own makeup brushes, you tend to use a variety of brushes to complete different looks - blender, liner, angled etc. Same goes for PMU, you might find that the cartridge you are using is not doing what you want and you may need to change up, so having this available will allow you to stay prepared and do your best work. Adaptability is key!
Shop Tina Davies I❤️INK Precision Needle Cartridges

Procedure Notes:
Technique: Etching, Whip Shading, Back & Forth & Flickering
Skin Tone/Type: Fair, Fitzpatrick 2. Green eyes with vascular eyelids.
Pigment Colors: Perma Blend Blackish Brown, Perma Blend Double Black, World Famous Caribbean Sea, World Famous Galapagos Green, World Famous Leaning Tower of Purple
Needles: Tina Davies I❤️INK Precision Cartridges 1RL .25mm and 3RL .25mm
Artist: Anita Abramo
Custom blend for your clients, and don’t be afraid to suggest color. Get them involved in choosing the colors and making the decision, play with your colors to get an understanding of what you can achieve.
Want to be inspired? See more creations created by Anita Abramo.

1 comment
Extremely helpful thank you & beautiful work
Sarah Vollelo
Leave a comment
This site is protected by hCaptcha and the hCaptcha Privacy Policy and Terms of Service apply.