Case Study: Shape & Color Correction
Case Study: Shape & Color Correction, Complete Eyebrow Makeover!

In today’s case study, we are sharing with you this absolutely AMAZING transformation created by the very talented Emily Joy, owner of Dollistic & member of the Tina Davies Pro Team, located in the US. Emily is the go-to brow correction artist in her area and, lucky for us, she’s sharing her secrets to create beautiful, breathtaking brows.
The shape of the brows can change the entire look of a person’s face. Understanding your clients facial structure and being able to create a shape that is most suitable for them is what will upgrade their brows from just average to absolutely GORGEOUS. This is much easier to do when working with a blank canvas, however, oftentimes clients will come with permanent makeup from previous artists, making your job a bit more difficult. Understanding your limitations and knowing what you can achieve is very important to creating a flawless brow.
Continue reading to learn Emily’s tip, tricks and secrets to how she was able to complete these absolutely breathtaking brows.
Procedure Details
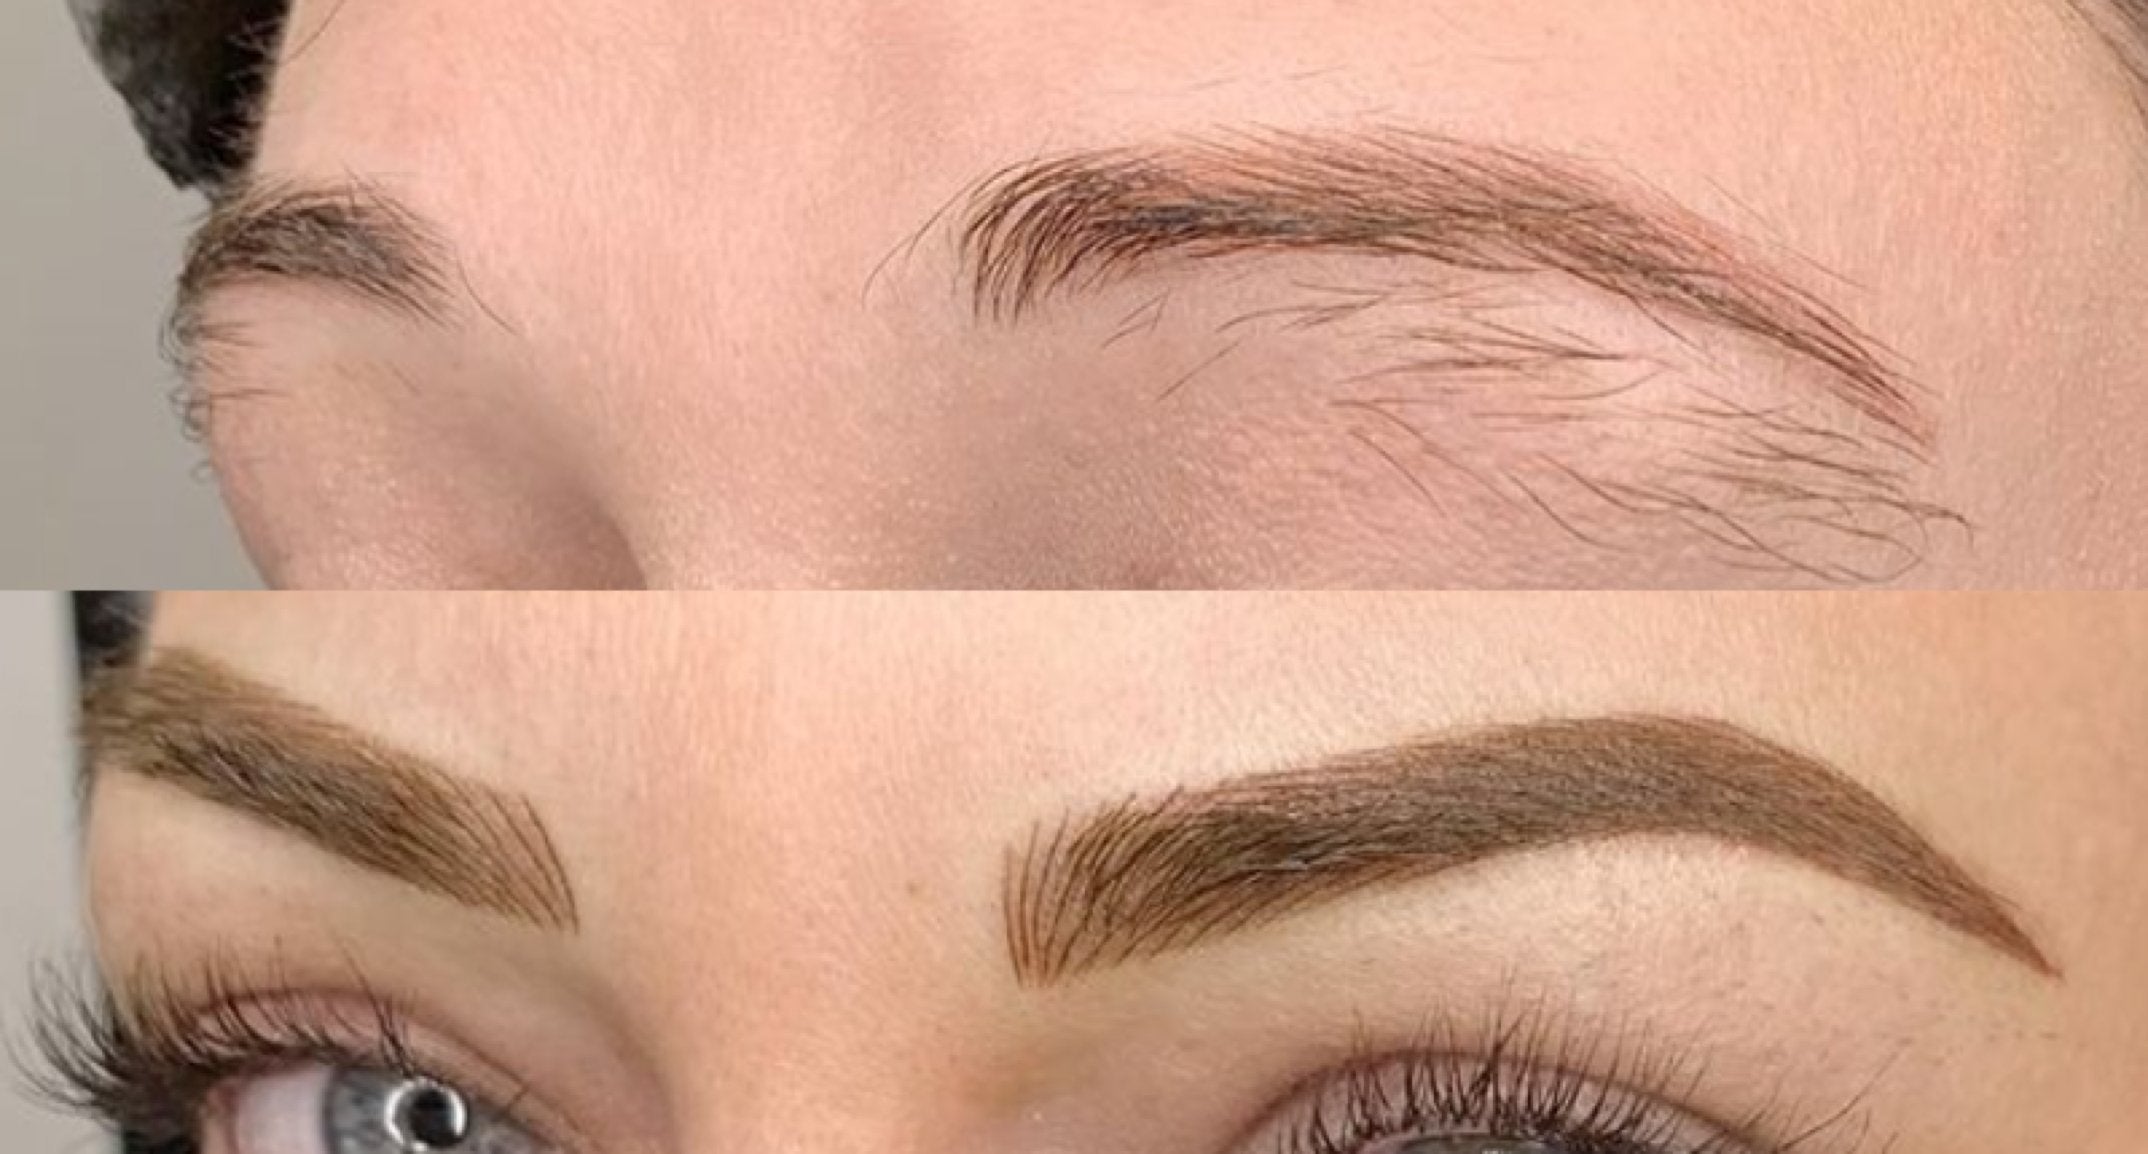
My client came into my studio with previous permanent makeup that was performed by another artist, it was about 10 years old. It was faded to a salmon pink color and the shape was in need of a refresh.
Trends change over the years, and while 10 years ago this shape may have been popular, it is not the current trending style and not the most suitable for her face shape. A more natural shape to suit face structure would be perfect.
Client Goal
She wanted a slightly thicker brow, not too thick, not too thin, more prominent arch with microbladed strokes only and a natural brown color. She was particular and knew exactly what she wanted.
 Before
Since she had previous PMU, I needed to manage her expectations. I don’t have a blank canvas to work with so this will cause limitations on what I would be able to create. It is important to explain to your client exactly what you are able to do and where there are limitations. Once they understand this, they can let go of control and trust in your skills and ability to create gorgeous brows.
The color was also faded salmon pink, so I knew in order to correct the color and cover the old PMU, some shading will need to be added throughout the brow, as microbladed strokes alone will not be enough to cover successfully.
Client Skin Type
My client has fair, Fitzpatrick 2 skin tone with neutral undertones. She has combination skin with normal thickness, apple skin type and is not super sensitive. Based on this, I knew I would not need to lighten my pressure and I would not need to worry about any cool undertones in her skin ashing out the pigment once healed.
Design Approach
The previous shape of her brows started too far apart and did not really suit her facial structure. To contour her face better, I would bring the fronts of the brows in and slightly down to create the illusion of the arch to help lift her eye. In order to achieve the fluffy strokes she wanted, I would do microbladed strokes only in the fronts of her brows to give her that soft, natural look and add shading throughout to cover the old PMU and create dimension.
For color choice, she was wanting to have a beautiful natural medium brown. With her previous PMU being a faded salmon/pink tone, I knew I would need to neutralize the color while also giving her a nice medium brown result. In order to do this I chose Perma Blend Mallard. Now, when you hear “mallard” you think of the duck with the green head, but Mallard is not green, but actually a very pretty medium brown color with a slight green undertone. The green undertone in the pigment will help neutralize the old salmon/pink color while also giving her a nice medium brown result.

Shop Perma Blend Mallard Brow PMU Pigment
Techniques Required
To cover the previous PMU a combination of microbladed strokes and shading is needed, the strokes to create a natural fluffy brow and shading to cover the faded PMU and add more dimension to the brow.
To create nice, precise, crisp strokes for a thinner brow, I chose the Tina Davies 9 Classic Microblade. I chose this microblade because it is not a flexible needle so it will allow me to do super crisp strokes and the small angled tip allows me to create fine detailed strokes from root to tip.
 Shop Tina Davies 9 Classic Microblade
With the old PMU, shading was going to be a must, however, my client's brow hairs were also very dense and coarse, so when you have a client with natural dense hair, microblading alone cannot match the same density. The additional shading will help blend and mask the microblading. Using a 1RL needle and micro-whip shading technique I will slowly pixelate the shading into the brow building saturation while continuing to follow the stroke pattern.
Pre & Pre-Draw

Pre-Draw
To begin my pre-draw, I start by placing a sticky brow ruler on the clients forehead, and measure out with the ruler where I want them to start with a line. Understanding facial anatomy will really assist you when doing cases just like these. Knowing what looks best based on these features, for example, if your client has close set eyes, you don’t want the brows to start too close together. Because her brows started too far apart, I would need to bring them in to better frame the face.
I started by using my china marker to draw hair strokes in the front of the brow to show the client where these stokes will be placed in the front and then I fill in the brow where I would have the shading start. This shows her how her brow will look soft with the hair strokes in the front. I always pre-draw one brow and have the client preview and agree to the shape before copying to the other side.
Pro Tip: My client also had quite long brow hairs, so I trimmed her brow hairs out of the way and used a brow razor to clean up any hairs that fell outside of my shape that I did not need.
Once my pre-draw and brow clean is completed and the client has approved, I then apply Zensa numbing cream over the design and let it sit for 20 minutes.
Plan Of Action
Once my client is numb, I begin creating crisp microbladed strokes with the 9 Classic Microblade and the pigment of choice, Perma Blend Mallard. I like to get all my hair strokes laid in one pass to create the least amount of trauma. Once I have completed my first pass, I will wipe and check my strokes to ensure they hit the “sweet spot”. If I need to reinforce a stroke, sometimes I will switch the direction of the microblade and use the tip of the blade to poke the pigment into the skin. I do this because I don’t want to dive back into the stroke with the whole blade and risk of blurring it, so slowly poking the pigment into the skin allows me to have more control over the pigment placement. Sometimes, I will stroke from top to bottom versus bottom to top to create a very fine point with the tip of the 9 classic microblade.
Once all of my strokes have been placed, I like to do a quick shading to open the skin before applying the secondary numbing cream. Opening the skin will allow the numbing cream to penetrate and work quickly. For my secondary numbing, I use Tag45, this does also include epinephrine, which causes the blood to constrict and cause the skin to become more rubbery making it more difficult to penetrate. This is why I only use it once throughout the procedure.
Once she is super numb, I begin to do some pixelated shading using a 1RL needle, with my Xion machine between a 6-6.5 speed. I use a micro-whip shading technique, which is a tiny one direction movement that follows the direction of the hairstrokes. Continuing to slowly build up the saturation.
Immediately After Procedure
 After
After
Emily's Pro Tips
Understanding color theory is crucial. Do not underestimate this knowledge. It is not as complicated as you think, but once you understand color theory you will be able to offer your clients beautiful results. Study the color wheel and know the skin is always part of the formula, understanding how skin tones and undertones play into the color formula is key. You most definitely will have clients with previous PMU already coming to you or you may even be correcting your own work in the future! Color theory + skin tone/undertone = beautiful healed brows.
Be selective with the clients you work on. By this I mean, you need to know your limitations and set realistic expectations for your clients. Do not promise anything you can’t deliver. For example, if your client has old faded PMU and only has microbladed strokes to cover, chances are, you will need some form of shading to successfully cover the old PMU. You are the expert, be sure to always educate your client on these limitations and what you recommend for the best results.
Thirdly, the products you use are also very important to your healed results. When I switched to Tina Davies and Perma Blend pigments, it was a complete game changer for my artistry. My clients would previously need a color correction before a year has passed, but with Perma Blend and Tina Davies pigments I no longer need to do this. They are lasting longer and look even better for longer. With quality products you can deliver quality results.
Procedure Notes
Technique: Combo BrowsAge: Mid 30’s
Fitzpatrick: 2, Neutral Undertones
Skin type: Apple skin type, Combination skin
Colors: Perma Blend Mallard Brow Pigment
Needle: Tina Davies 9 Classic Microblade Hairstrokes and Machine Shading with Vertix Nano 1 RL Needle
Artist: Emily Joy, Dollisitc
4 comments
I am very interested in using your products
Thanks!
Victoria cabrera
Beautiful results and great insight! Thank you!
Loni M Hale
Excellent content! I affirm your skin+undertone is a factor in choosing tones and maintaining pigment accuracy. Great read!
Jamie Muzzin
Very nice I’m very thankful for all your explanations step by step I will keep your block to reviews when I need to apply one of your tips than you so much
Connie Garcia
Leave a comment
This site is protected by hCaptcha and the hCaptcha Privacy Policy and Terms of Service apply.